
Remplacement de la batterie de l'iPhone 15 Pro Max par transfert de la carte BMS
The iPhone 15 Pro Max delivers incredible performance, but like any modern device, its battery degrades over time. Replacing the battery on this model requires more than a simple swap—it involves a BMS (Battery Management System) board transfer to ensure proper calibration and restore full battery health.
This step-by-step guide covers the entire process, from safe disassembly to final flashing and calibration, helping repair shops, refurbishers, and advanced DIY users complete the job with confidence.
Why This Repair Matters
Apple's latest iPhones integrate the battery closely with the logic board. Without a proper BMS transfer and tag-on flex installation, replacement can lead to inaccurate battery health readings, reduced performance, or dissatisfied customers.
- Repair shops can provide premium quality service.
- Refurbishers can restore iPhones for higher resale value.
- DIYers can achieve an OEM-like repair experience.
Step-by-Step Guide
Step 1: Initial Checks and Preparation
- Check the original battery's health.
- Power off the iPhone.
- Remove the two Pentalobe screws at the bottom edge.
Step 2: Remove the Display
- Place the phone face-up on an iPhone separator (80°C).
- Fix the device with clamps, apply suction, and heat.
- Lift the screen carefully and apply ethyl alcohol to soften the adhesive.
- Insert an opening pick and slide around the edges.
- Open the iPhone and rest the display on a holder.


Note: Do not insert the pick more than 3 mm, as you may damage internal components.
Step 3: Disconnect and Remove Components
- Unscrew and remove the connector bracket.
- Disconnect the battery, display, and front sensor cables.
- Remove the display.
- Cover the cameras with protective stickers.


Step 4: Remove the Old Battery
- Apply ethyl alcohol to loosen adhesive.
- Pry out the battery gently with a spudger.
- Clean remaining adhesive and wipe the case with an alcohol-dampened sponge.


Step 5: BMS Board Transfer
- Remove protective tape and cover on the original battery.
- Use a ceramic cutter to remove the BMS board (avoid shorting terminals).
- Grind off old tabs and lift flaps to 90°.
- Prepare the REPART replacement battery cell tabs and align with the BMS board.
- Spot-weld both tabs securely.
- Trim tabs, fold down the board, and reapply the protective cover and tape.


Step 6: Install Tag-on Flex and Recalibrate
- Install the pre-programmed tag-on flex on the BMS board.
- Use an activation tool to activate the new battery.
- Arrange the tag-on flex neatly in the casing gap.


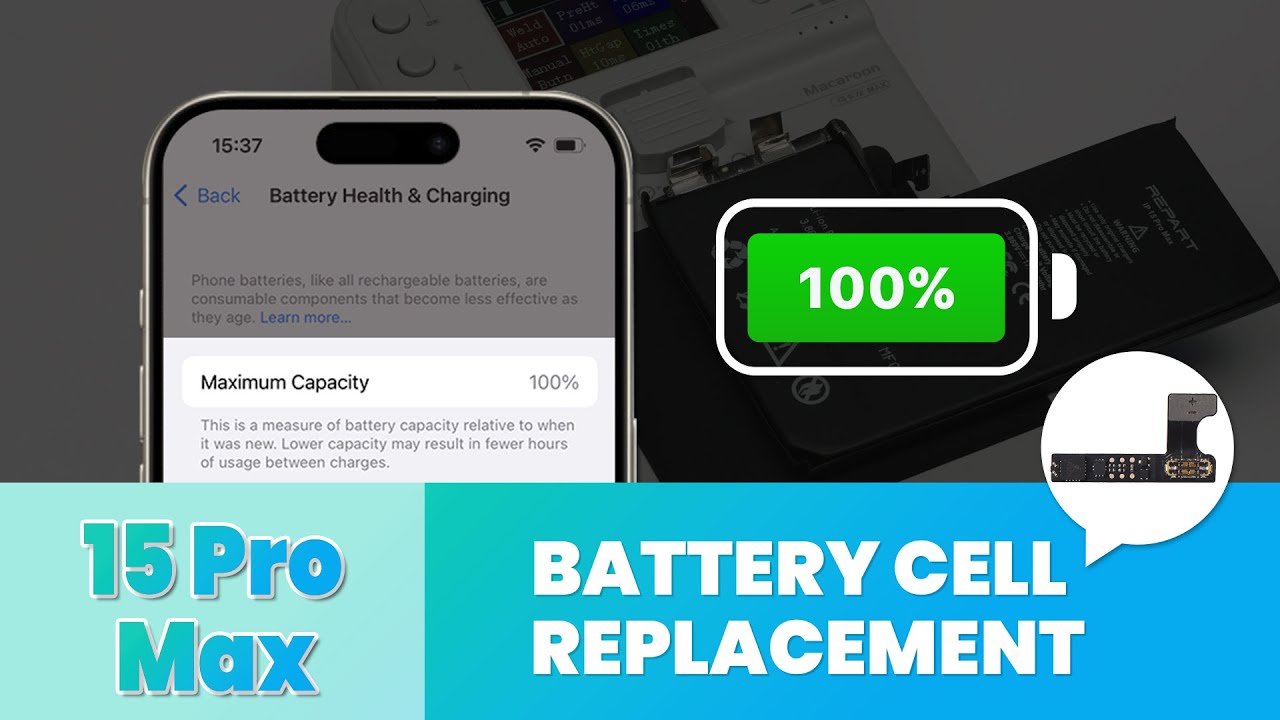
Step 7: Flashing to Restore 100% Battery Health
- Connect the iPhone to a PC with 3uTools.
- Go to Smart Flash → Quick Flash Mode.
- Tick "Fix battery health during Flash."
- Follow prompts to disconnect/reconnect the battery cable during flashing.
- Wait for completion and confirm recalibration.


Step 8: Final Assembly
- Install new adhesive strips and secure the battery.
- Reconnect all display, front sensor, and battery cables.
- Replace the connector bracket and screws.
- Seal the display with adhesive and tighten bottom screws.
- Power on the iPhone and verify cabled and wireless charging.


Tools & Parts You'll Need
Pro Tips for Repair Shops & DIYers
- Always back up customer data before flashing.
- Protect the camera sensors throughout disassembly.
- Test BMS board stability after welding.
- Provide a warranty on replacements to boost confidence.
Conclusion
Replacing an iPhone 15 Pro Max battery is not a beginner project—it requires skill, precision tools, and knowledge of BMS board transfer and flashing. By following this guide, repair technicians and experienced DIYers can restore devices to peak performance and 100% battery health.
Frequently Asked Questions
Why is BMS board transfer required for iPhone 15 Pro Max battery replacement?
Apple ties the battery's BMS board to the device for calibration. Without transferring it, the phone may show incorrect battery health.
Can I replace the iPhone 15 Pro Max battery without spot welding?
No. Proper spot welding ensures secure electrical connections and safety.
What happens if I skip the tag-on flex installation?
The battery may function but won't display accurate health data, which affects diagnostics and resale value.
Do I need to use 3uTools for flashing?
Yes, 3uTools provides the required "Fix battery health" feature to recalibrate to 100%.
How long does this repair usually take?
For skilled technicians, around 45–60 minutes. Beginners may take longer.
Is this repair safe for DIY users?
Only if you have prior experience and access to the correct tools. Otherwise, professional service is recommended.
-
Publié dans
aftermarket parts, battery, battery cell


